A Guide to Writing Programs using the Ministry Platform API
Portfolio Overview: This is an article written for a vendor’s knowledge base. It was written toward those who needed a “cookbook approach” to using a very important piece of the vendor’s capability. Prior to this article, there was no single set of documentation that described how to do this — only piece meal examples of code that had to be stitched together to get a complete picture of how these capabilities interacted and worked. I took this code, wrote procedures and added screen shots as an enhancement to the process.
Ministry Platform provides a structured method that allows a program to retrieve data from, and optionally insert (careful!) data into its database. This method is referred to as the Ministry Platform Application Programming Interface (MP API or just API).
The MP API uses an architecture called REST. REST (which stands for REpresentational State Transfer) is an architecture that enables a server to pass data to a calling program over the web using HTTP protocols. REST will allow you to write programs that make requests to the MP API then incorporate the received data from MP into their processes.
OAuth, Credentials and Tokens
For security reasons, MP does not allow any random, web-based program to retrieve data from its database simply by sending a request to the API. The design of the API requires that the program requesting data from MP or submitting data to the API be authorized to do so before the request is fulfilled.
Authorization requires that any client program using the API presents credentials that prove who they are, what capabilities MP has granted them and what data the client program has the right to consume.
In order to control access to MP data via their API, MP has implemented a standard method to authorize applications to read from and write to the MP database. The method used to authorize applications is called OAuth2.
The steps required to use OAuth2 to obtain authorization is called a flow. (There are may types of OAuth flows). Each flow defines an authorization process with steps that are suitable for different situations.
For a program to access the MP database, the flow starts with a program sending an authorization request to a specific MP endpoint (URI). This request must contain content (credentials) in a format required by OAuth2. MP validates the credentials then returns a token. This token is an indication that you have been authorized. After authorization is completed, all requests to interact with the MP API must include this token.
Tokens have a limited lifespan. They expire after a predetermined set of time and you must be re-authorized to obtain a new token.
Once MP has provided a valid token, you use it as part of the API request to obtain data from or write data to the MP database.
Tools and Skills
MP and Microsoft supply a number of tools to help programmers understand the proper way to use the MP API.
These and other tools should be at your disposal if you are going to write programs that interact with MP:
- SQL Server Management Studio: SSMS is a program allows you to write and execute SQL statements that retrieve and write (careful!!) data to the MP database. It is also a useful tool to help you understand the database structure because it will show you each table in the database as well as each of the columns in the table.
- Swagger: Swagger is a tool included with MP. It allows you to test various the entry points to the MP API and will help in generating the URIs and Curl code needed to make calls to the MP API. Swagger is available on your MP installation at: https://my.churchname.org/ministryplatformapi/swagger
- Postman: Postman is a tool that allows you to test the complete end-to-end flow required to retrieve data from the MP database starting with the required authorization then proceeding to API calls. Postman can be downloaded from its website.
- Your favorite code editor and editing environment.
- A web server where your program that requests data from MP will run.
Other skills that might be useful as you are writing programs to interact with the MP API are:
- An understanding of how to write SQL query statements
- A basic understanding of the HTTP GET and HTTP
- A basic understanding of web protocols and how REST works
- A basic understanding of JSON and how to process data sent to your program in JSON format
This document focuses on the use of Swagger and Postman and provides an overview of the proper methods and processes to use the MP API. Information about the SQL language is available from other sources.
Definitions:
The following definitions may be useful as you read the remainder of this document:
- PhP: PhP is a computer language that is executed on a web server. Its output is HTML. PhP is often used to add programability and interactivity to a web page.
- API: An API (Application Programming Interface) is a set of rules defined by a software vendor that allows a user written program to interact with another application. Most well known applications have a defined API that allows their core functionality to be incorporated into user written programs. Use of an API in a user program often requires the program to prove that it is authorized to do so.
- URI: A Uniform Resource Identifier is a method to identify specific resources that identifies a resource. One of the most familiar forms of a URI is a URL that is used to retrieve content from a website.
- cURL: cURL is a library (collection of programming tools) that is used to make transferring data between a program to a website easier. There is a good beginning tutorial for using cURL here: http://www.hackingwithphp.com/15/10/2/your-first-curl-scripts
- JSON: JSON stands for JavaScript Object Notation. JSON is a format for exchanging data over the web. It is human readable and easy for machines to process using programming libraries.
So… on to getting authorization and actually getting that data you need.
How To Use the MP API
A summary of a process you could use as part of developing a program to use the MP API is as follows:
- Use the SQL Server Management Studio to write and test an SQL query that returns the data you want
- Use Swagger to create your URIs needed to access the MP API and get the data you need. The clauses of your SQL statements developed in step 1 will be incorporated as parameters in the URIs that Swagger builds.
- Once you have developed the URIs, make sure that you have added proper credentials in the API Clients table in the MP Database
- After you have set up the credentials in the API Clients table, use Postman and your credentials to develop and test the URIs necessary to get the required authorization tokens.
- Continue using Postman to combine the tokens with the URIs you developed in Swagger that retrieve data using the API
- Once you are satisfied that you are retrieving the data you want, incorporate the URIs into your client program and process the JSON data returned by the calls to the API.
Here is a detailed step-by-step workthrough of the process. In the following example, our goal is to use the API as part of a program to retrieve a list of events that occur on a certain date and sort the dates by their start time from earliest to latest.
Step 1: Create the SQL Query
Use SQL Server Management Studio to create and test the following SQL statement that returns information about events that occur on a certain date.
select Event_Title, congregation_ID, Event_Start_Date from events
where cast([event_start_date] as date) = '06/03/2018'
order by [event_start_date] ASC
Step 2: Use Swagger to Create a Call to the API
This step uses Swagger to format the call to the API and allows you to verify that the API call results in the data and the format you are expecting.
Open Swagger at
https://my.mychurchname.org/ministryplatformapi/swagger and find the API call and the parameters that need to be supplied with the API
For this example, look at the list produced by Swagger under the TABLES section. The entry for GET /tables/{table} shows that you can return a list of records from the specified table satisfying the provided search criteria.
Click on the GET button for this entry, the click on the ON/OFF button to start the authorization process.
Swagger will display an overlay entry window that asks you to select the scopes you will grant to the API. In this case, there is only one scope available.
Check the box next to the scope URI the click the Authorization button to start the process
The ON/OFF slider will turn to ON to indicate that the authorization was successful
The parameters section shows me that the API call that I need has one required parameter and a number of optional parameters. The parameters that need to be specified are:
| Parameter | Value | Description |
| table | events | A required value that is the name of the table from which records will be retrieved. |
| $select | Event_Title, Event_Start_Date | An optional list of the columns to be returned. If this parameter is not supplied then all the columns for the records that meet the filter criteria are returned |
| $filter | cast([event_start_date] as date) = ’06/03/2018′ | An optional expression that specifies which records should be retrieved |
| $orderby | event_start_date ASC | An optional expression that specifies the list of columns used to sort the result. If omitted, the results are not sorted. |
At this point, you are probably asking “How do I know what the parameters for $filter and $orderby are supposed to be?”
It turns out that the MP API is designed so that there is a relationship between the clauses in SQL statements and the parameters used in the URL.
Use the contents of the SQL “where” clause (See step 1) as the value of the $filter parameter and the contents of the SQL “order by” parameter for the value of the $orderby parameter. The paring of the other SQL clauses and their associated parameters follow these examples.
Supply these parameters to Swagger then click “Try It Out”
Swagger will return four pieces of information:
- A cURL statement that can be used with the PhP cURL library. The cURL library is used to make HTTP requests from within a PhP program. Note that the token that is returned in this statement will have to be replaced with a token that you generate by submitting your authorization credentials.
- The Request URI that can be used to call the API. This is the URI that you will supply, along with the token you receive to Postman and in your program.
- The Response Body that contain the JSON stream of data from the API
- The Response Code from the HTTP GET as well as the Response headers from the HTTP GET
Note that the URL returned in in item 2 is a properly encoded “safe” URL. When reading the URL, you can use the following substitutions (a good reference for encoded characters is at https://www.w3schools.com/Tags/ref_urlencode.asp)
| Character | Equivalent |
| %24 | $ |
| %2C | , |
| %5B | [ |
| %5D | ] |
| %20 | space |
| %3D | = |
| %2F | / |
One other note. Remember that using the API first requires authorization credentials to obtain an authorization token. Swagger take care of these items “behind the scenes” but as you will see later, you will have to supply these items using your credentials to use the API.
Copy the Curl and/or Request URL that Swagger returns. You will use this later with Postman as part of your development process.
You should verify the data that is returned in the Response Body to make sure that it is what you expected. If it is not, you will most likely have to adjust the values you are supplying to Swagger as the parameters.
Step 3: Add API Credentials to the MP Database
If you haven’t already done so, the next step is to add credentials to the MP Database. These credentials will allow your program to obtain authorization from MP to use the API.
Credentials are added by adding a record to the table called API Clients.
If you have the correct MP admin privileges (talk to your data SPOC), you can do this by expanding the System setup section of the MP Menu and opening the API Clients table.
Here is a sample of a credential that has been added to the API Clients table for our example. Some of the items are blurred out for security reasons.
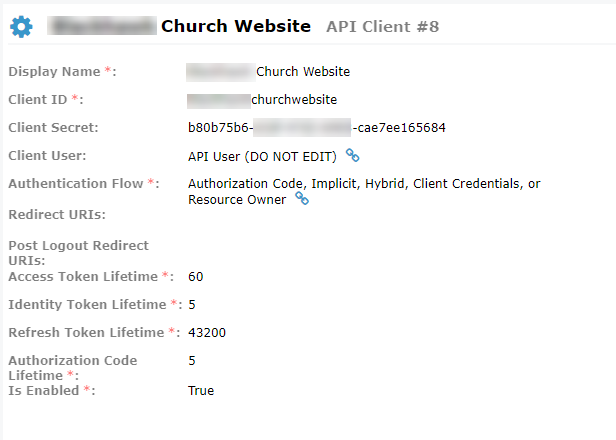
Adding Credentials to the Ministry Platform Database
Each row of the API clients table contains the following values (Note that not all these fields are displayed when you display the contents of the table. You will need to add a new record to this database or open each record to see the full contents):
- Display Name: This is the “pretty” name that is used when viewing the records
- Client ID: The id that you need to send as part of your OAuth request. Many users have one id for each client that is making an OAuth request. If your program does any modifications to the MP database, this is the id that will be written to the audit log. Separate Client IDs will make it easier to track what program is making modifications to your database.
- Client Secret: An identifier used to prove the identity of the client making the request for a token. This should be a long, complex, not easily guessable string that is sent along with the request for a token. It is suggested that you use a GUID (pronounced GOO-id) or a long, random string of characters. There are places online that will generate GUIDs or random passwords that fit these requirements.
- Client User: This is the ID of the platform user that the client (your program) will utilize. The security roles and permissions of this user will determine what access the API client has. It is recommended to use “API User”. Its value is pre-filled when you create a new record in this table. Do not edit this field for existing records unless you check with Think Ministry beforehand.
- Authentication Flow: This is a comma delimited list of OAuth flows (request types) that are allowed when using this Client ID. Additional information on OAuth flows and what they do can be found online.
- Redirect URIs: Required for clients that will ask a user to manually authorize access to data using an implicit OAuth flow type. This is the URI that will be called after a user is authenticated. It should catch and process the user information needed for the application.
- Post Logout Redirect URIs: this is an optional field. Leave it blank if you are not using this feature. The value in this field is the URI where the user will be taken after they logout of your client application.
- Access Token Lifetime: This is a value (in minutes) of the lifetime of the access token that is returned to the client. After this time, the client must request a new token by making a request that includes the old token. Depending on the design of your client, it may be practical to make a new request and receive a new token each time your client needs data from Ministry Platform. When you create a new record in the API Clients table, a default value is assigned to this field.
- Identity Token Lifetime: The length of time, in minutes, until the Identity Token expires. The Identity Token is used to pass user information to the client once the user has authenticated. It is not needed after that and therefore can have a very short lifespan. When you create a new record in the API Clients table, a default value is assigned to this field.
- Refresh Token Lifetime: The length of time, in minutes, until the Refresh Token expires. When you create a new record in the API Clients table, a default value is assigned to this field.
- Authorization Code Lifetime: The length of time, in minutes, until the Authorization Code expires. When you create a new record in the API Clients table, a default value is assigned to this field.
- Is Enabled: This field indicates if this client id can be used (True) or cannot be used (False) to make API requests
Credentials need to be created only one time, they don’t expire, and they can be re-used as needed.
Step 4: Use Postman to obtain an API Access Token
Postman is an open source software application for developers that will allow you to use your credentials along with a POST request to obtain an access token. You then use Postman again to submit a GET request (that includes your token) to the MP API. The result of this GET request will be a stream of data in JSON format.
If you haven’t already done so, search the web for, then install a program called Postman.
Start Postman and use the opening screen to Create a new Request.
The overlay screen that shows up is optional and is used if you want to save your request for later use in Postman. You can skip this screen by closing it.
You will need to supply the following information for postman so that it can complete the request
- Request Type: From the dropdown box underneath the tab bar, select POST
- Access point URI: Next to the POST request type, enter the URI of the access point to obtain a token. The access point URI is: https://my.churchname.org/ministryplatformapi/oauth/connect/token
- Format of the POST body type: Click on the Body option to enter the parameters that will be passed with the POST.
Make sure that the button next to “x-www-form-urlencoded” is selected and supply the following key/value pairs
| Key | Value |
| client_id | the Client ID value from the API Clients table of the client making this request |
| client_secret | the Client Secret value from the API Clients table |
| grant_type | grant_type indicates the type of information that is being returned. It will always be client_credentials indicating that the operation is returning the credentials that the client will use as part of its request. |
| scope | A scope indicates what the access token can do and what resources it can request. This URI (http://www.thinkministry.com/dataplatform/scopes/all ) returns a list of the scopes that can be granted as part of this request. |
Click SEND from the Postman interface to submit the POST to MP.
The figure below shows how to format the POST. The lower half of the windows shows the data returned from the POST.
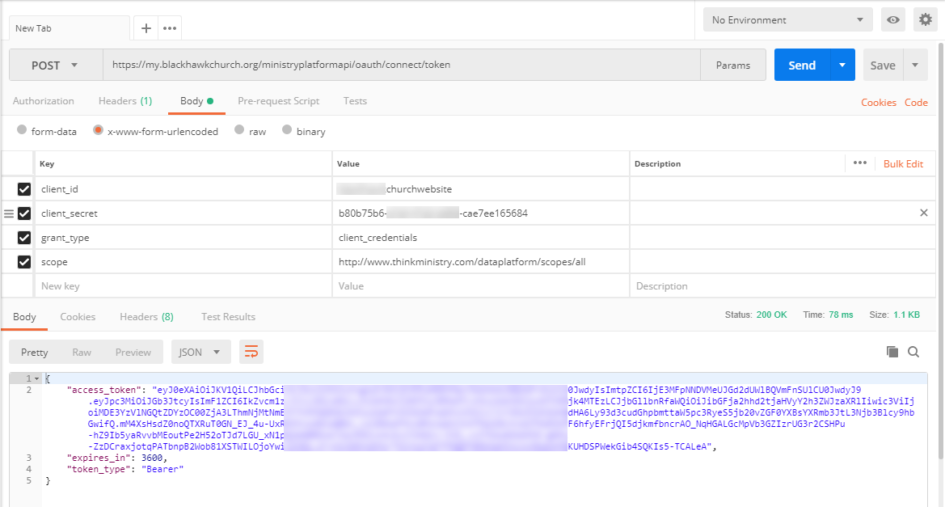
Submitting The Request Using Postman
If the request is successful, you will receive a stream of data back from the OAuth server in JSON format with the following fields:
- “Access_token” – the actual access token (it’s long) that needs to be included with requests to the MP API
- “Expires in” – the value (in seconds) that indicates when the token will expire
- “token_type” – the type of token that is being returned. In Oauth, Bearer Tokens are the most common token used in with Oauth 2.0. This type of token will always be returned from MP.
A note on the “expires_in” parameter. The returned value for this parameter is expressed in seconds and is obtained from your credential in the API Access table from “Access Token Lifetime” (which is the value in minutes). After the token expires, you will have to obtain another token. To make programming easier, it is suggested that you don’t consider the lifetime of a token when you use it but that you obtain a new token each time you need one.
Save the URI and the JSON string so you can use it in the next step.
Step 5: Generate a Request to the API
Now that we have the token, we can generate and submit a request to the API using Postman. The call to the API is a GET (not a POST like you used when you obtained a token).
Open a new tab to create a new request. You will need to supply Postman the following information:
- Request Type: GET
- Access point URI (request URL): https://my.churchname.org/ministryplatformapi/tables/events. (This URI was generated by Swagger in step 2 above.
Select Headers under the request URI and supply the following :
Key: The Key Name must be “Authorization” and the key value must start with the string “Bearer” followed by a space, followed by the entire access token you received from the previous step.
Click SEND to send the GET request to the MP server.
The figure below shows two tabs in Postman. The first tab was the request for a token, the second tab is the request using the token to the API
The lower part of the Postman window shows the response from the server in JSON format.
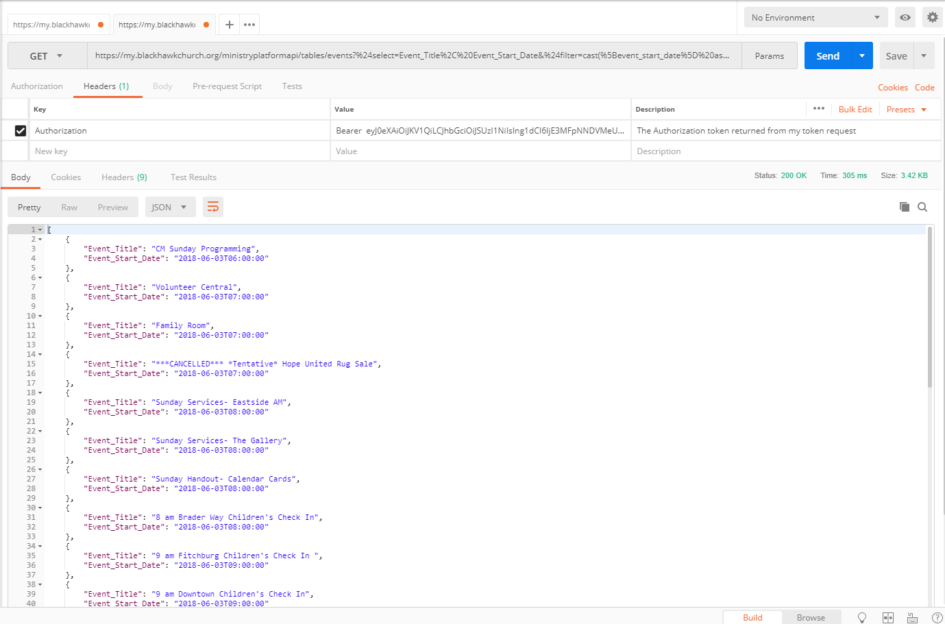
Postman Response showing returned data is JSON format
Step 6: Incorporate the Authorization Request and the Call to the API into your program
At this point, you should now have a URI properly formatted to obtain a token and a URI that you combine with the token to call the MP API and obtain data.
You now need to incorporate these URIs into your program as part of the following steps:
- Program step 1: Make a POST request to obtain a token from MP using your access credentials
- Program step 2: Process the JSON returned from step 1 to extract your token
- Program step 3: Make a GET request to the API along with your token
- Program step 4: Process the JSON returned from your API request
Here is the completed PhP source code that can be used to retrieve the data we wanted.
<?php
// Program Name: dates_from_mp.php
// Author: Fredric Gluck / fbgluck.com
// Purpose: Sample program that retrives data from MP using
// OAUTH and their API
// Rev: 1.0
// ************************************************
// FUNCTION: getMPAuthToken
// Purpose: Gets an Authorization Token after submitting proper
// credentials.
// Parameters: None
// Returns: the authorization token

function getMPAuthToken() {
  $curl = curl_init(); // Set up the items we need to execute the cURL request
  curl_setopt_array($curl, array
    (
    CURLOPT_URL => "https://my.churchname.org/ministryplatformapi/oauth/connect/token",
    CURLOPT_RETURNTRANSFER => true,
    CURLOPT_ENCODING => "",
    CURLOPT_MAXREDIRS => 10,
    CURLOPT_TIMEOUT => 30,
    CURLOPT_HTTP_VERSION => CURL_HTTP_VERSION_1_1,
    CURLOPT_CUSTOMREQUEST => "POST",
    // The following values are from the API Clients table in MP
    CURLOPT_POSTFIELDS => "client_id=mychurchwebsite&client_secret=b80b75b6-d1bf-47d2-b983-cae7ee165684&grant_type=client_credentials&scope=http%3A%2F%2Fwww.thinkministry.com%2Fdataplatform%2Fscopes%2Fall"
    )
  );
  // Execute the request we just set up
  $response = curl_exec($curl);
  // and check for errors
  $err = curl_error($curl);
  // Release the cURL resorces
  curl_close($curl);
  // Process error and decode the JSON response into an array
  // for later use
  if ($err)
  {
    echo "cURL Error #:" . $err;
  }
  else
  {
    // Save the token data that is returned
    $tokenDataArray = json_decode($response,TRUE);
    return $tokenDataArray["access_token"]; // return the token that was retrieved
  }
} // **************** END FUNCTION ****************************

// Program Execution Starts Here:

// Set up the parameters so we can make the API request using cURL
  $curl = curl_init();  // initialize and set up the cURL data structures
  curl_setopt_array($curl, array(
  // This is the URL produced by SWAGGER
    CURLOPT_URL => "https://my.churchname.org/ministryplatformapi/tables/events?%24select=Event_Title%2C%20Event_Start_Date&%24filter=cast(%5Bevent_start_date%5D%20as%20date)%20%3D%20'06%2F03%2F2018'&%24orderby=event_start_date%20ASC",
   // and these options were produced from Postman
    CURLOPT_FAILONERROR=>true, // manage errors properly by stopping execution
    CURLOPT_RETURNTRANSFER => true,  // return the results as a string
    CURLOPT_ENCODING => "",
    CURLOPT_MAXREDIRS => 10,
    CURLOPT_TIMEOUT => 30,
    CURLOPT_HTTP_VERSION => CURL_HTTP_VERSION_1_1,
    CURLOPT_CUSTOMREQUEST => "GET",
   // and incorporate the necessary data into the header of the request
    CURLOPT_HTTPHEADER => array(
      // Make sure you have a space after the word Bearer
      "Authorization: Bearer " . getMPAuthToken(), // Call the function to return the authorization token and add it to the request header
      "Cache-Control: no-cache"
    ),
  ));
  // Execute the cURL request with the cURL data structure and place the data into a string variable
  $retrieved_json_data = curl_exec($curl);
  // Save the error state of the request
  if (curl_error($curl)) {
    $err = curl_error($curl);
  }
  curl_close($curl); // We are done with the cURL data structures. Away they go.

  // Do this if there was an error generated from the cURL call. You should add better error processing but
  // this is probably OK for our example
  if (isset($err)) {
    echo "Program Failure - cURL Error #: " . $err;
    die; // so sad :(. Terminate the program
  }
  else // no error. Lets just process the JSON string that was returned
  {
  	$retrieved_data_array = json_decode($retrieved_json_data,TRUE); // parse the returned JSON string into an array
  }
?>
<!Doctype HTML>
<HTML>
  <Header>
    <title>Events from MP</title>
  </Header>
  <Body>
    <H1>Events</H1>
    <table id="events_table">
      <?php
      // We go through the array of data and pick out each element and display it in a table
      foreach ($retrieved_data_array as $obj)
      	  {
            echo ("<tr class='event_row'><td class='event_title'>".$obj[Event_Title]."</td><td class='event_time'>".$obj[Event_Start_Date]."</td></tr>");
      	  }
      ?>
    </table>
  </body>
</HTML>